Tag Archives: L.A. Colors

Nail Art Tutorial: British Union Jack Nails

British Union Jack Nails Nail Art Tutorial & PicturesBritish Union Jack Nails are everywhere, I watched this cycle of America’s Next Top Model (“British Invasion”), and it’s the Queen’s Diamond Jubilee. What better time than this to challenge myself with a new freehand nail-art design? 🙂

Indeed, it has been far too long since my last nail-art tutorial. I’m feeling rusty, but I’ll try my best to stop making excuses and to bring you another fun tutorial.

Now, just want to put it out there – these British flag nails aren’t completely accurate. If you want to stay true to the flag, make your horizontal and vertical red lines thicker than the diagonal ones. Also, don’t connect the red diagonal lines to the center like I did.

Despite the inaccuracy, I was very happy with it because it’s very bold and eye-catching. 😉 In fact, the first day I wore this design to work, everyone I spoke with noticed. Plus I didn’t have to explain that it was the British flag – they got it right away. (And it reminds me a bit of Captain America…haha!)

Even if you’re not a Brit (Hey, I’m not! Canadian here!), I urge you to give this a go. It’s fast to paint, you don’t need many colours, and the main design just consists of straight lines.

Come…let me show you how to do it. With written instructions and step-by-step photos, you’ll be recreating Union Jack nail art in no time! 🙂

Continue reading

Share

Nail Art Tutorial: Easter Egg Nails

Easter Egg Nails Nail Art Tutorial & PicturesWell, lookie here. Mr. Tom Thumb decided to make an appearance. “What better occasion than for the unveiling of Easter Egg Nails?” He told me.

(Don’t tell him, but he’s kind of a hot head, thinking that he’s better than the other fingers just because he’s bigger. And he keeps talking about how without him, humans wouldn’t be able to brag about having opposable thumbs…or play an octave on the piano with one hand. *Pfft*)

Today I’m going to show you how this Easter nail design is very easy to do. I’ll walk you through it step-by-step with written instructions as well as photos so you can see the process and not just the end result.

Continue reading

Share

Nail Art Tutorial: Valentine’s Day Nails

Valentine's Day Nails Nail Art Tutorial & PicturesHappy Valentine’s Day, everyone!

I love Valentine’s Day because it serves as a reminder to appreciate the people we’re so lucky and blessed to have in our lives whether you’re happily married or single.

Will you all be my nail Valentine? 😉

It seems like it’s been a long time since I’ve done a nail-art tutorial, and I couldn’t let February 14 roll by without doing something!

So, here are some quick little Valentine’s Day Nails. If you turn your head to the right (or look at my other photos in this post), you’ll see that they have fluffy, white clouds that have lightning and that are raining down a slew of hearts.

My inspiration for this was the cheesy (but fun!) song, It’s Raining Men! Instead of men, though, I thought I’d paint hearts.

This is a very easy manicure that you can whip up in a pinch. Hope that some of you will try it sometime, even if you don’t today. 🙂

I wish you all love and happiness! Thank you for being the best blog readers in the world – it brings tears to my eyes at how loyal you are!

Continue reading

Share

Nail Art Tutorial: Candy Cane Nails

Candy Cane Nails Nail Art Tutorial & SwatchesToday I bring you more festive nail art – Candy Cane Nails! I love the way candy canes look hanging on a tree. And, although I think all the fun-flavoured ones are delicious, my favourite is the simple, classic peppermint candy cane.

When my brother and I were kids, we weren’t supposed to eat any of the candy canes from the Christmas tree until December 25th. At least, that’s what my parents would always remind us of every year.

But kids don’t always do what they’re supposed to do. We conveniently ‘forgot’. And we were naughty.

When my brother and I thought nobody was looking, we’d snatch one off the tree, make a beeline to our bedrooms, and devour them in secrecy. The whole time, we thought ourselves to be very clever.

It was always a few days before Christmas when my parents would mention how there were fewer and fewer candy canes on the tree. Counting them proved that they were right.

(They knew all along that we had been snatching them off the boughs, but always had a soft spot and let it go. Unfortunately, their readiness to forgive made it easier for us to justify snatching the candy canes off the tree when the little angel and little devil would appear on either shoulder. ;))

These days, I have way more self-restraint when it comes to eating candy canes. I can wait until Christmas. Perhaps I have all those years as a candy-cane thief to thank for that…

Continue reading

Share

Nail Art Tutorial: Snowflake Nails

Sunlight Snowflake Nails Nail Art Tutorial & SwatchesHere are the Snowflake Nails I’ve been wearing for quite some time. Actually, I procrastinated quite a bit when it came to snapping photos, so all these photos you see are of my 4-day-old manicure.

Later in this post, I show you how to recreate it. This is one of the easiest looks that I’ve ever done, and even if you have a shaky hand like I do, it’ll turn out great. Precision isn’t required for this design! 🙂

*Plays trumpet* All the pictures (except the step-by-step tutorial photos) were taken with my new camera! *Jumps up and down*

They were the result of my first 10 minutes fiddling around with the Canon EOS Rebel T3i DSLR camera. Even though it was my first time using a Canon camera and my first time using a DSLR, I found it to be extremely user-friendly.

I still have to experiment with it some more because there are so many cool settings I must try out so I can get more creative. For now, though, I was pleased with how it performed…especially in dim natural light (which was my true test because my old Sony Cyber-shot always produced grainy photos in that setting). Also, shades of blue like this gave my old camera a really hard time. Seemed like it ain’t no thang for the Canon! Continue reading

Share

Nail Art Tutorial: Chicken Drumstick Nails

Sunlight Chicken Drumstick Nails Nail Art Tutorial & Pictures
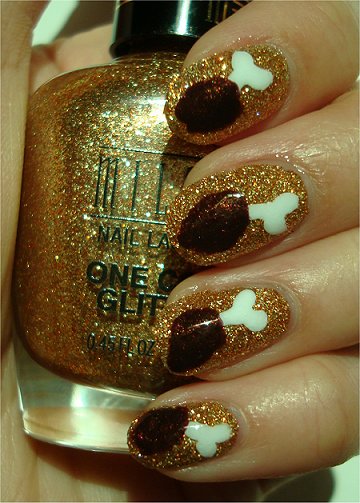
Yesterday I shared my thoughts on Milani One Coat Glitter Gold Glitz with you. I was really impressed that it actually was dense and indeed covered my nail with just one coat.

The only thing was I felt like I couldn’t properly rock that shade of gold and orange glitter, so I did silly nail art on top of it.

Here are the Chicken Drumstick Nails I ended up doing. 🙂 With poultry on my nails, I was way more comfortable sporting this manicure. It reminds me a little of shake ‘n’ bake chicken.

For the bone, I used an L.A. Colors white striper, and for the meat, I used OPI Espresso Your Style!, which is a pretty shimmery brown.

Hehe, I don’t know how many of you will actually want to recreate this look. I still took step-by-step photos of it as I was painting so that I could include a little nail-art tutorial for you. Maybe you’ll want to modify these and turn them into turkey drumsticks for your American Thanksgiving. 😛

Side note: I was a vegetarian for 4+ years partially as a personal challenge and partially because I saw an alarming documentary, Earthlings. I couldn’t watch it all because it was so disturbing. (If you click on the link, you’ll be taken to the free online video of it. Warning: It’s very depressing and graphic.)

These days, I do eat meat, but only 1-2 times per week. (I’ve always loved the way meat tastes, but I got really used to cooking vegetarian dishes over the years, so it’s really only when I eat out that I tend to eat meat. And after being a vegetarian for a few years, I learned that there are tons of delicious meatless dishes. Some of them, like the vegetarian lasagna I make, still tastes way better to me than any I’ve tried with meat! That really surprised me. Sometimes we just have to give new things a chance.)

Continue reading

Share

L.A. Colors Enchanting Review & Swatches

Image of L.A. Colors Enchanting** This post was written by Fiona. She no longer blogs for Swatch And Learn. However, Mary still continues to blog and will be happy to reply to your comment. **

I get excited trying out new brands. Whether the product is a dud or a stud, I like knowing that I have the option to choose from a wide range of brands at various price points. I even like it more when the product I try turns out to be a winner.

Take L.A. Colors Enchanting for example. It’s my first experience with L.A. Colors, and I never expected the shade to have so much depth and personality. It’s a duochrome that reminds me of a cornucopia, perfect for autumn. But to heck with that: I’m wearing it in the summer anyway!

BTW, happy August, everyone! Continue reading

Share