Category Archives: Nail Polish Swatches & Reviews

OPI Excuse Moi! Swatches & Review

Natural Light Excuse Moi OPI The Muppets Collection Swatches & ReviewOPI Excuse Moi! is the pink glitter polish from the OPI The Muppets Collection. At first I overlooked it because I had my eyes on the chunky glitter polishes, which I previously swatched and reviewed.

But I had to try this one out because I thought that perhaps this would be the pink that I would fall in love with.

It’s different than what I expected. The other glitter polishes take 3 or more coats to cover the nail, and they’re really meant for layering. On the other hand, OPI Excuse Moi! is waaaay more pigmented and isn’t really meant for layering over other polishes.

While this colour isn’t my favourite pink polish, it definitely gets points for being unlike any other pink I have in my collection.
Continue reading

Share

Sally Hansen Pumpkin Spice Swatches & Review (Layered Over OPI Espresso Your Style!)

Sally Hansen Pumpkin Spice Swatches & Review smallerCall me a Chupa Chup because I’m always a sucker for polishes that bring to mind fond autumnal memories.

There’s something fresh about the way the air smells that makes me giddy. Or, who knows, maybe that’s just the result of my neighbour finally deciding to vacuum his carpets. 😉

On a serious note in B flat minor, I sometimes crave a rich fall lacquer nearly as much as a fresh slice of pumpkin pie. (Note: I said nearly, so don’t you dare swipe my dessert!)

Sally Hansen Pumpkin Spice satisfied my craving. And I think seconds are in order. Please, sir, I want s’more!

I decided to layer it instead over OPI Espresso Your Style!, which is a decadent shimmery brown that makes a subtle difference. I really enjoyed this combination.
Continue reading

Share

Nail Art Tutorial: Mummy Nails

Mummy Nails Nail Art Tutorial & SwatchesToday’s Hallowe’en nail art: Mummy Nails!

I decided to put a little spin on it. I tried to go the underground-graphic-novel route for my mummy nail art.

Classic mummy nails consist of more horizontal lines, but, as you can see, I changed it up by adding lots of thick diagonal and vertical lines. I felt like this gave it more of a wrapped and comic-sketched feel.

This is another design that’s super simple to do – you need 3 colours and it’s just freehand lines and dots.

Plus the cool thing about giving them red eyes is that if you accidentally smear them while putting on a top coat (like I did), it actually gives them that bloody-eye look, which is tres chic avec les momies, n’est pas? 😛

Continue reading

Share

OPI Warm & Fozzie Swatches & Review

OPI Warm & Fozzie Swatches & ReviewLast month, you’ll remember that I swatched and reviewed 4 glitter polishes from the OPI Muppets Collection.
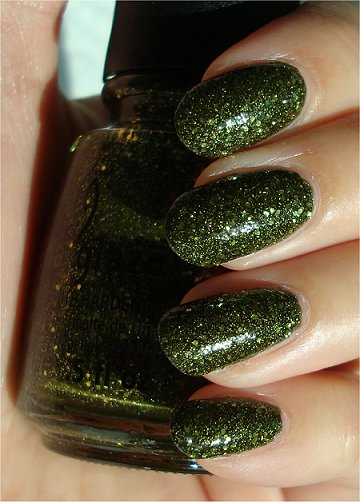
I didn’t think that I’d have more to review before the official release of the collection, but PR was kind enough to send me more colours – this one as well as another shade!

So, today I have the pleasure to bring you OPI Warm & Fozzie, which I loved a lot more than I thought I would! 😀

Now, brown polishes don’t usually do anything for me, but this one’s really different, and photos don’t do it justice.

It’s a warm copper that at first looks ordinary. But with closer inspection, you’ll see that there are actually pinkish (or rust-coloured) micro-glitter that gives it more dimension.

Allow me to go into this in more depth. Continue reading

Share

China Glaze It’s Alive Swatches & Review

China Glaze It's Alive Swatches & ReviewHold the polish!

I’m going to announce something crazy: China Glaze It’s Alive from The Haunting 2011 Collection just might be my favourite green nail polish ever!

Considering that I’m a green-lacquer fiend, this is really saying something. Honestly, it’s just perfect, and the 2 different kinds of glitter put the icing on the delicious cake.

Last week, I was in a mad rush to paint my nails and then head out the door. This is pretty rare for me because I’m a nocturnal painter.

The night before, I removed my polish and was going to paint my nails, but I was so tired that I just fell asleep. So the next day, I scrambled to paint my nails before leaving the house.

I quickly grabbed a bottle of It’s Alive, a colour I had been wanting to try ever since I bought it many weeks ago.

It was love (and lust) at first brushstroke!

I will definitely need to purchase a back-up bottle of this because I plan to sport this many times. It’s my Holy Grail green!

P.S. Happy Thanksgiving to my fellow Canadians! 🙂

Continue reading

Share

Essie School of Hard Rocks Swatches & Review

Essie School of Hard Rocks Swatches & Review
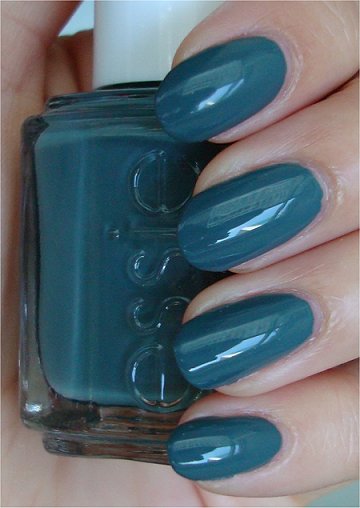
Essie School of Hard Rocks sent me to class to learn a lesson that I already knew: not every polish wants to cooperate with my camera. This Breakfast Club member isn’t afraid of detention.

No matter what lighting I snapped shots of it in, it would not photograph true-to-colour. In all of my photos, it looks like a dusty blue (at least on my monitor), but in reality, it’s this gorgeous slightly-dusty teal that tends to lean more on the green side.

But I don’t think it’s all just a lighting problem. The camera I have is around 5 or so years old. After I save up more money, I really would love to invest in a digital SLR camera and proper lighting. But that’s a long way off.

And like I always say, it’s not about what you can buy. It’s more about what you can do with what you already have that counts!

Despite the colour inaccuracy, I just had to blog about School of Hard Rocks because it’s a fantastic colour! Plus I really like the name. (I’m still waiting for a company to come out with a polish called Knuckle Duster…if they haven’t already. I’d buy it just for the name.)

I’m really hoping that Essie continues to produce more colours like this instead of sheers, whites, reds, and pinks. 🙂

Continue reading

Share

Nail Art Tutorial: Witch Nails

Witch Nails Nail Art Tutorial & SwatchesI’m having a lot of fun doing Hallowe’en nail art, so I’ll keep going with it. 🙂

There’s nothing more classic than a witch on a broom flying across a moon, cackling as the menacing wind makes her cape flutter.

Since this is one of my favourite Hallowe’en scenes when I was a child, I decided to do Witch Nails this time!

(Turn your head to the right to see it better…hehe, or just look at my horizontal swatches of it later on in this post.)

Hope you like ’em. They’re really fast to do as long as you have the stamping plate. Even if you don’t, perhaps you could freehand some pointed witch hats on your nails and maybe put a broom on an accent nail.

Also, consider adding some glitter on the moon to highlight it and to give it that extra bit of magical twinkle!

I left it plain and classic. I encourage you to put your own creative touch on your nail canvas! Have fun! Continue reading

Share