 Back in 2011, I did Santa Nail Art where each nail featured The Big Man in Red’s suit. I really loved that design, and even though I wanted to wear it again, it was time for a challenge. (Click to see my step-by-step tutorial for the Santa Suit Nail Art!)
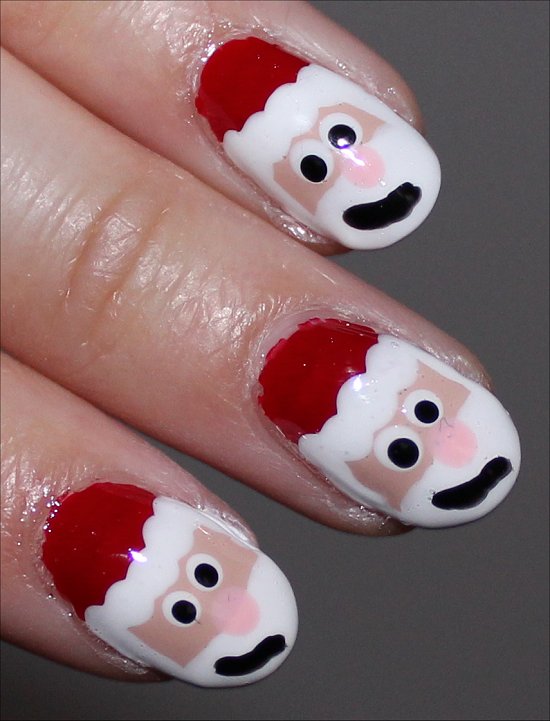
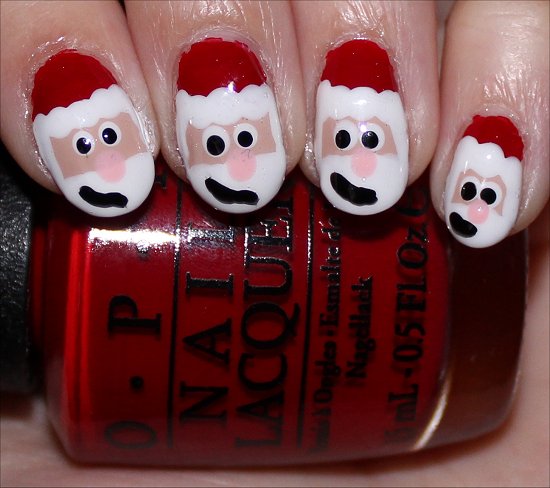
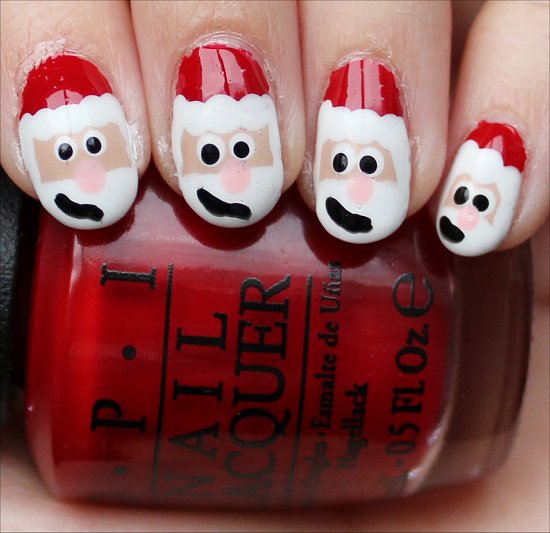
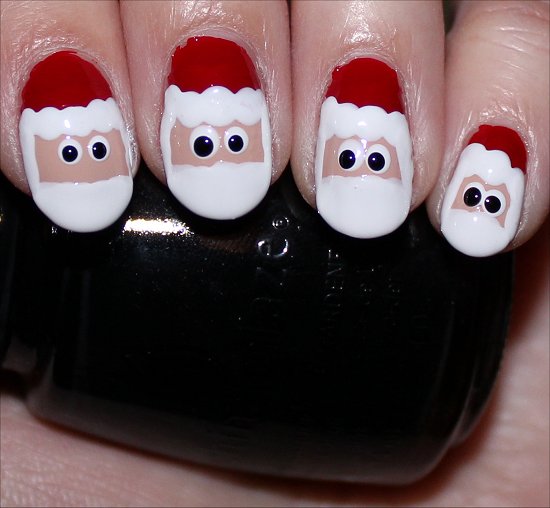
After seeing The Little Canvas’ cute nails with Kris Kringle’s face, I knew I had to try my hand at this design. Although mine didn’t turn out as well as neatly as hers, I had tons of fun painting this, and it was fun to bring my Santa Claus gang with me everywhere I went! (Thanks to The Little Canvas for the inspiration!)
Haha, I intended the Santas to be smirking or to at least look happy, but I guess my nail striper brush was a bit too thick and I was rushing a little. So, some of my Santas look like they’re being very sarcastic. Haha, can you spot which one drank too much of the spiked elves’ Christmas punch? 😛
Hey, it would be neat to combine this and the santa-suit design in a single manicure. You could even paint Santa’s hat on one nail. That would allow you to paint a whole bunch of different designs.
Santa Claus Nail Art Swatches
All swatches have:
- OPI Nail Envy Nail Strengthener (Used as a base coat)
- 2 coats of Zoya Chantal (Pale Tan)
- 2 coats of OPI What’s Your Point-settia? (Red)
- China Glaze Liquid Leather (Black)
- OPI Angel with a Leadfoot (White)
- Zoya Dot (Pale Pink)
- Seche Vite Dry Fast Top Coat
Note: All polishes, except for the base coat, top coat, and China Glaze Liquid Leather were provided by the company/PR.
Flash Photos



Natural Light Photos



*~* Santa Claus Nail Art Tutorial *~*

What I Used:
- Daniel Stone Art Tool 1
- Striping Brush
- OPI What’s Your Point-settia?
- OPI Nail Envy Nail Strengthener
- Zoya Chantal
- OPI Angel with a Leadfoot
- Seche Vite Dry Fast Top Coat
- China Glaze Liquid Leather
- Zoya Dot
Step 1: Prepare Your Nails by Applying a Base Coat
Step 2: Begin Painting Santa’s Face
You don’t need to paint everything up to the cuticle, since you’ll be covering up that area anyway.
Here, I used 2 coats of Zoya Chantal from the Naturel Collection.

Step 3: Paint Santa’s Red Hat
It doesn’t matter if this part is sloppy because the section where the two colours meet will be covered.
Here, I used OPI What’s Your Point-settia? from the Gwen Stefani Holiday Collection.

Step 4: Add the Fluffy Trim on the Hat
This part is really fun because you get to whip out your dotting tool. To get the ‘fluffy’ appearance, just connect the dots.
The white nail polish I used was OPI Angel with a Leadfoot from the Ford Mustang Collection.

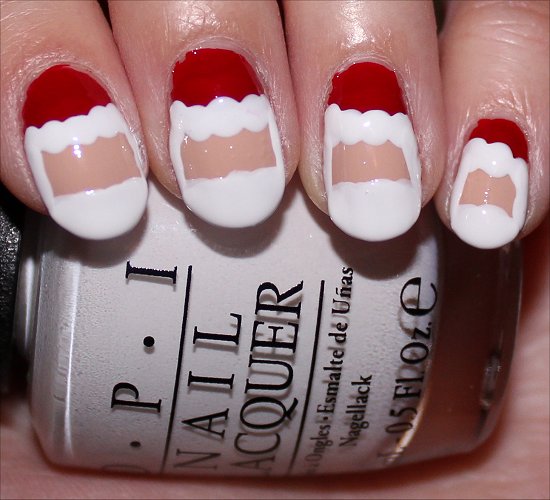
Step 5: Start Santa’s Beard at the Sideburns
You could use a nail striper brush to paint this part, but I just used my dotting tool and dragged the white along the left and ride sides of each nail.

Step 6: Complete the Beard
Using the brush right from the bottle, paint the tips of your nails white.
Step 7: Give Santa Sight
Using your dotting tool dipped in the white polish, add two circles on each nail. (You can create different expressions depending on how close or far apart these circles are.)

Step 8: Add the Pupil
Using a smaller dotting tool, add the pupils. You can make each Santa look in a different direction. And if you make one pupil bigger than the other, like what I did for my middle finger, you can make Santa look like he drank the elves’ spiked Christmas punch! 😉
The black nail polish I used is my all-time favourite black, which is China Glaze Liquid Leather.
Step 9: Get Nose-y
Using a pale pink, press down more with your dotting tool to create a larger dot or oval. (If you have a dotting tool that’s a larger size, you can use that, too.)
The pink I used was Zoya Dot from the Awaken Collection.

Step 10: Add a Grin
Using your striper brush dipped in the black nail polish, add the smiles to each nail. You can make them smirk like I did…or have a sarcastic expression. Haha! You could also make them fully smile from ear to ear. They’re your nails, and it’s your lovely creation, so you hold the reins to creative freedom! 🙂 Remember, always paint what makes you happy! (Perfection isn’t the goal. Happiness is!)

Step 11: Apply a Top Coat
Wait a minimum of 15 minutes before you slap on a shiny top coat that will seal everything in.
Step 12: Check to See If You’re on the Naughty or Nice List
The last time I checked, I was on the Naughty List. But strangely enough, Santa’s Naughty List went missing. *Hums and looks around innocently* 😉
Do you know what you’re going to wear for your Christmas manicure? Is there any other Christmas or holiday nail art you’d like me to do a tutorial on? Are you on Santa’s Naughty or Nice List? 😉
P.S. In case you’re curious, below is the Santa Suit Nail Art I did back in 2011. Click the link or the image below to see my full tutorial for it.


VERY cute!!! I love both of these designs. I’ll have to try them.
Hey Melissa!
It would be fun if you used the Santa Claus design here and did one or two fingers with the Santa Suit design. 🙂 I wanted to do that, but right now I’m on a kick where I want lots of faces on my nails. 😉
So cute! lol I love the sideways half-smile. 😉
Lizzy recently posted: Born Pretty Store Stamping Plate BP-21
Hey Lizzy!
Haha, I didn’t intend for some of them to be so wavy. I was laughing with a co-worker last week about it because the more I looked at my manicure, the more at least two of the Santas seemed to be giving me a sarcastic expression. Haha!
Awww…this is soooo cute! I super love the colors used and the Santa design as well. Never knew that this is easy to create. I will try to do this.
Hey Julie!
Thank you very much! 🙂 It’s soooo much fun to paint, and you can finish it quickly. The only part that takes the longest is waiting before applying a top coat at the end. Other than that, you can fly right along.
I tried this last Christmas (only as an accent nail because I’m awful with nail art) and it came out great! My nieces loved it and I ended up doing Santas for them too 🙂
Hey Susana!
I’m so happy that you tried this out! 🙂 Also, remember that nobody runs out of the nail-art gate with perfect manicures. Nail art takes practice, and even if it’s not perfect, the design is yours to enjoy. That’s the most important thing! I’m very happy to hear that you and your nieces enjoyed wearing Santa nail art!
I love these santas! So cute!
Hey Zoey!
It’s fun to bring 10 “friends” with you everywhere! 😉