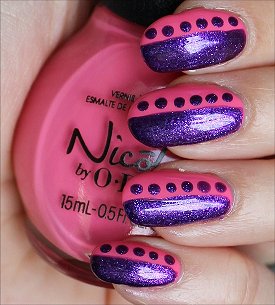
 When you want a completely customizable design that makes a statement that ends with exclamation points, try out my Bold Nail Art Tutorial Featured on PromCanada.com!
(You can click here to see the original article on Prom Canada, or continue reading this post for the tutorial.)
It uses just two different nail-polish colours, and it’s very quick to paint, so it’s not only ideal for a prom look, but for any time when you want your nails to be bold and really pop.
The pink I used is Nicole by OPI LeaPink for Joy (from the Seize the Summer Collection), and the gorgeous, shimmery purple is Nicole by OPI Back in My Gloria Days… (from the Modern Family Collection), which lends a sharp contrast, while still creating a girly manicure.
If any of you decide to try it out, please tag me on social media, so I can see and share with my readers!
Bold Nail Art Swatches
All swatches have:
- Nicole by OPI 3-in-1 Base, Top Coat & Strengthener
- 2 coats of Nicole by OPI LeaPink for Joy (Provided by PR.)
- 1 coat of Nicole by OPI Back in My Gloria Days… (Provided by PR.)
- Seche Vite Dry Fast Top Coat
Natural Light Photos


Step 1: Apply a Base Coat
I used the Nicole by OPI 3-in-1 Base, Top Coat & Strengthener.
Step 2: Paint all your nails with your base colour.
(I chose a cute pink.) Then, wait about 5 minutes before proceeding to the next step.
Shown here:
- Nicole by OPI LeaPink for Joy (from the Seize the Summer Collection)

Step 3: Use a Contrasting Colour to Paint Vertically Down Half Each Nail
Your second colour should be a contrasting shade because it will really make your manicure pop!
I also recommend choosing a polish with a different finish because that’ll also help it to stand out. (Here, I used a gorgeous, sparkly purple to add drama against the pink creme polish.)
Take your time to carefully paint half of each nail with your second colour. Don’t worry if the line isn’t perfectly straight. (Look at mine. They’re not all straight, either.) Remember, nail art is about having fun. Make happiness your goal instead of perfection!
Shown here:
- Nicole by OPI Back in My Gloria Days… (from the Modern Family Collection)

Step 4: Get Dotty!
Now’s the extra fun part!
Using a dotting tool (the end of an old makeup brush you don’t mind getting dirty, a bobby pin, a pen cap, etc.), use your second colour to add a vertical line of dots. Allow your manicure to dry for at least 15 minutes before apply a top coat (like the Nicole by OPI Quick Dry Top Coat) to avoid smudging the design.

Design Suggestions:
- Use your first colour to create a second line of dots for extra oomph.
- Paint half of your nails with the second colour on a diagonal for a twist.
What colour combinations would you pair together for this nail design? What are your two favourite colours that you like wearing for a manicure?
Edit: It’s always nice when companies give the ‘small guy’ some exposure on social media. Thanks, Prom Canada and Nicole by OPI, for sharing my nail tutorial with your Twitter followers! 🙂


Those colors are so pretty together. Loving that pink!
Lizzy recently posted: Rubix Cube With Salon Perfect: Ruby’s Cubes
Hey Lizzy!
Thank you! 🙂 Glad that you liked my simple nail art!
I LOVE this design. Simple but oh so pretty! The colors were also a good match. Thank you for sharing this design with us.
Hey Melissa!
Aww, thanks! 🙂 I love coming up with simple designs that people can easily replicate without having to buy a lot of different tools or polishes. I think that everyone should try their hand at nail art, and once you do a simple design, it helps to build confidence, so you can test the waters with something more intricate!
Yay for easy nail art! I need to try this when my dotting tools come in the mail :). Love the color combo too!
Jessica recently posted: Mannequin Hands with Essie’s Topless and Barefoot
Hey Jessica!
Once you start doing dotticures, you’ll want to put dots on everything! It’s as fun and addictive as popping bubble wrap – haha! 😉
gorgeous color choices!