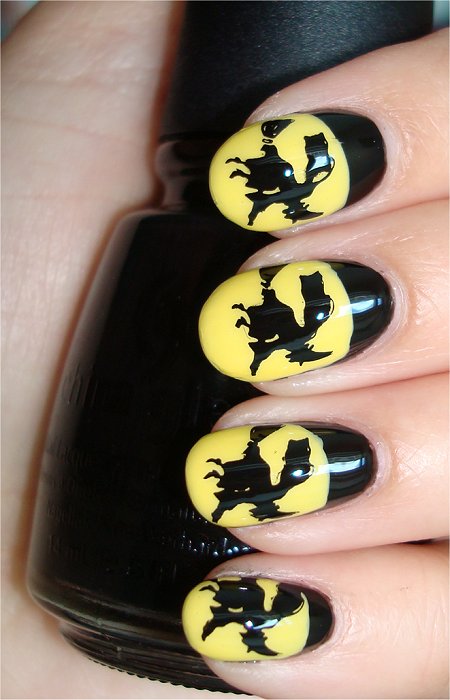
 I’m having a lot of fun doing Hallowe’en nail art, so I’ll keep going with it. 🙂
There’s nothing more classic than a witch on a broom flying across a moon, cackling as the menacing wind makes her cape flutter.
Since this is one of my favourite Hallowe’en scenes when I was a child, I decided to do Witch Nails this time!
(Turn your head to the right to see it better…hehe, or just look at my horizontal swatches of it later on in this post.)
Hope you like ’em. They’re really fast to do as long as you have the stamping plate. Even if you don’t, perhaps you could freehand some pointed witch hats on your nails and maybe put a broom on an accent nail.
Also, consider adding some glitter on the moon to highlight it and to give it that extra bit of magical twinkle!
I left it plain and classic. I encourage you to put your own creative touch on your nail canvas! Have fun!
Witch Nail Art Pictures
All swatches have:
- Nubar Foundation Base Coat
- 3 coats of China Glaze Liquid Leather (Black)
- Moon: 2 coats of Orly Spark
- Witch:
- Stamping Polish: Konad Special Nail Polish in Black
- Image Plate: Bundle Monster Image Plate BM13
- Seche Vite Dry Fast Top Coat

Flash

Flash

Flash

Flash

Flash – (Hehe, it’s like the hand from The Addams Family!)

Flash

Natural Light

Natural Light

Natural Light

Natural Light

Flash

Natural Light
*~* Witch Nail Art Tutorial *~*

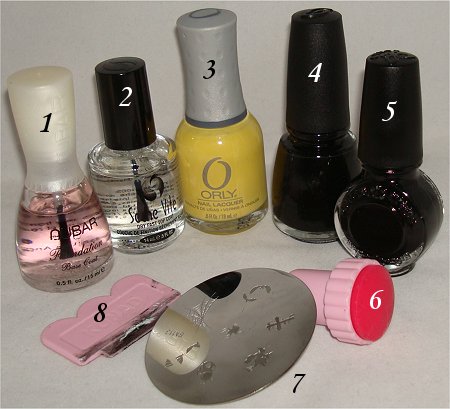
What I Used:
- Nubar Foundation Base Coat
- Seche Vite Dry Fast Top Coat
- Orly Spark
- China Glaze Liquid Leather
- Konad Special Nail Polish in Black
- Konad Stamper
- Bundle Monster Image Plate BM13
- Konad Plastic Scraper
Step 1: Apply a Base Coat
Step 2: Paint Your Nails Black
I was already wearing an all-black manicure, but if you’re doing this from scratch, consider just painting a small part black starting from the cuticle and only going down maybe a third of the way. (You’re going to be covering up the rest of your nails with yellow polish anyway.)
Wait about 8-10 minutes to allow this to dry a bit before proceeding to the next step.

3 coats of China Glaze Liquid Leather
Step 3: Add the Moon
Pick a pastel yellow polish (or your favourite yellow lacquer). This will be the moon! Draw a horizontal curved line. Then use regular vertical strokes to fill in the rest of your nails.
Wait until all this is completely dry before continuing to the stamping part. Or, if you’re like me and you want to speed things up, consider adding a fast-drying top coat at this point.

To see more swatches & a review of Orly Spark, click on the above link.
Step 4: Stamp on the Witch
Using Bundle Monster Image Plate BM13, stamp on the witch design. Don’t worry if your witches aren’t at the exact same angle on each nail. Witches fly in all different directions. I know because I’m friends with one. 😉 (“I’ll get you, my little pretty! And your little dog, too!)
If you’re new to the wonderful world of Konad/Bundle Monster/nail stamping, please check out my Konad Tutorial that features step-by-step photos and instructions for how to use the nail-stamping system. (I wrote that post the second time I ever tried nail stamping, so I go into great depth about the problems I faced as a beginner. I hope you’ll find it helpful.)
Wait a good 10-15 minutes to allow your design to dry before applying a top coat. You don’t want to risk smearing your hard work, so please be patient and wait. Hum a song. Look at nail swatches online. Do anything you need to make time go by faster. 🙂

Step 5: Add a Top Coat
When you add your top coat, try to use a light hand and try to keep a thick enough bead of top coat on your brush so that the brush itself doesn’t actually touch the design. I find that this greatly helps avoid smearing stamping designs.

Step 6: Cackle like a Witch the Next Time You Sweep the Floor with a Broom
Nail art for Hallowe’en is incredibly fun. I still have a few more ideas that I will try to execute for you! 🙂 And please share with me any of your Hallowe’en nail art.
Have you ever dressed up as a witch for Hallowe’en? Do you ever dream about flying? Is the Wicked Witch of the West from The Wizard of Oz your favourite witch?


Haha! Wicked cute Mary, I love that the witch is on the moon, I think this is perfect!
Nicole recently posted: Focus On Black: Revlon Facets Of Fuchsia
Hey Nicole!
Hehe, glad you liked it. It’s never really Hallowe’en unless there’s a witch. 😉
I love how it both looks like it’s a ruffian mani and how it’s really the moon. 😀 Great minds think alike; I was actually thinking of doing something similar. But since I don’t have that plate, I was thinking of freehand-ing it. Haha, maybe after a lot more practice!
Carmela recently posted: Nail Art Wednesday: Special Birthday Nails Part 1
Hey Carmela!
Ohh, that’s cool how you’re going to freehand it. 🙂 I can’t wait to see how it turns out. The beauty of freehanding is that you truly can design anything you want – absolutely no restrictions.
So cute! I love that you have combined stamping with the ruffian look to make a unique nail design. Your designs always make me smile. 🙂
mellinail recently posted: Up and Coming Talents
Hey mellinail!
I’m so happy to hear that! *Cackles and then flies away on her broom*
OMG! That is so cute!! 😀
Abigail recently posted: China Glaze — Swatch
Hey Abigail!
Thank you! Maybe you’ll try something like this for Hallowe’en?
These are soo cute! XOXO
Hey Polish Vixen Marisa!
Thank you! 🙂 Do you have any Hallowe’en nail designs in mind for later this month?
super cute. thanks for the tutorial. I shall try something like that
Hey pretty!
You’re very welcome. 🙂 Yay…if you take photos, please show me. I’d love to see.
Love the witch 🙂 Cute Halloween mani… You are so good at stamping!!
Hey preciouspearl!
Aww…thank you. I just like playing around a lot with the stamps. 🙂
Biiiiig FAN! Yay for dusting off your stamping kit!
You know, I’m a huge fan of the half moon top you left peek through from under the yellow it is an awesome touch.
You know, I must be getting old… I knew they were witches… but strain my neck as much as I could my brain would not co-operate… I had to wait to the horizontal swatches to go “wooooow”… *sigh* damn aging 😉
Another pretty!
So yesterday I tweeted you a link that had your candy-corn photos… and while flattering they didn’t provide a link back to your blog and I was a bit upset with that… cuz your talent deserves the recognition GIRL!
Marta recently posted: Barefoot and Pink 😉
Hey Marta!
Yeah! I haven’t done any stamping for a while! Feeling rusty…I’ll definitely have to do more stamping designs. (I love yours – they always look so elegant!)
I have this stamping plate! AWESOME!
thenailaholic recently posted: 1955-2011
Hey thenailaholic!
Then you should totally try this design! 🙂 The witch was exactly what I needed…broom and all. And I didn’t have any problems picking up and stamping the image. It was etched deep enough.
Totally cute! I wouldn’t be able to resist throwing a coat or two of glow-in-the-dark polish over the moon before stamping. ; )
Aren recently posted: It Ain’t Easy Bein’ Green… And Yellow.
Hey Aren!
YES – a glowing moon would be such a clever touch! Great idea!
these are great! 😀
Michelle Miller recently posted: Tarina Tarantino Sparklicity!!!!!!
Hey Michelle!
Thank you so much! 😀
These are seriously THE coolest!! Super awesome job with this design, Mary!! 😀
Hey Ruthe!
Aww…thank you so much! Hehe, what’s Hallowe’en without a witch, right? I just had to do this design. Classic!
So freaking awesome! I love these!
imfeelingnail-venturous recently posted: Halloween Nail Design
Hey imfeelingnail-venturous!
*Cackles* Thank you, my little pretty! *Flies away on my broomstick*
I love it!! I’ve been doing Halloween themed manis since October started!!!
Alexis recently posted: Whistling Past The Graveyard
Hey Alexis!
Your latest one is so amazing, too. Love the freehand nail art you did. 🙂