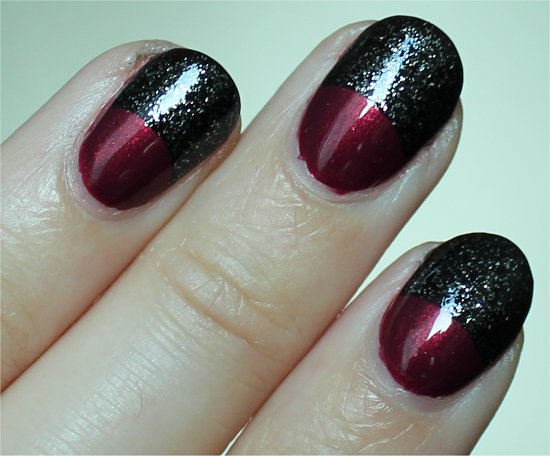
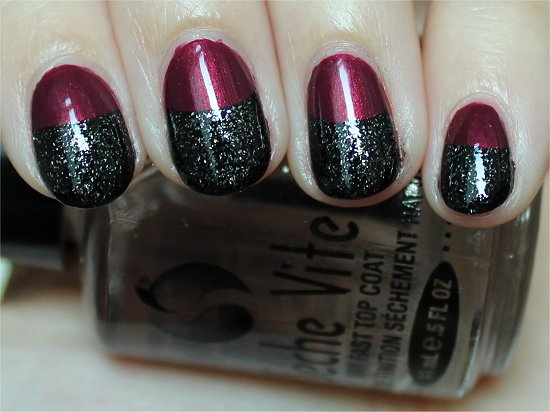
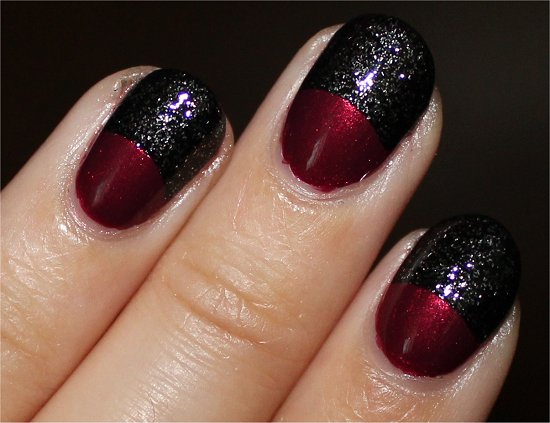
 One of my wonderful readers asked me a little while ago if I could do Ruffian Nails with fall colours. It was exactly the push I needed to make my first attempt at this nail-art design.
I used Illamasqua Charisma and Illamasqua Creator, 2 polishes that I recently reviewed. (I’ve included links to both posts later on in case you’re curious about seeing swatches.)
Okay, so this colour combination is more winter than fall. And for a traditional Ruffian manicure, I should’ve brought the black further up on the nail so that there’s less of the raspberry showing. Now I know for next time! 🙂
Edit: Originally I called these Ruffian Nails. Hmm…but I now think it’s more accurate to call them Half Moon Nails. Apparently Ruffian nails are like thin Cs along the cuticle. Rats! All this time I thought this is what Ruffian nails were. Sorry about the confusion! I’ve swapped out the text later on in this post. (Looks like I’ll have to do another look to fulfil my reader’s request.)
Another Edit: Click here to see my post which actually features Ruffian nail art!
Half Moon Nail Art Swatches
All swatches have:
- CND Stickey Anchoring Base Coat
- 2 coats of Illamasqua Charisma (raspberry) – Provided by Illamasqua
- 1 coat of Illamasqua Creator (black with silver micro-glitter) – Provided by Illamasqua
- Seche Vite Dry Fast Top Coat
Natural Light Photos


Flash Photos


Tips & Tricks for How to Create a Half Moon Manicure
Use Hole-Reinforcement Stickers
While you could paint the tips freehand, I opted to use those hole-reinforcement stickers that you can find at Staples or any other stationery store. These act as nail guides so you’ll get a crisp line.
The stickers are very inexpensive. I bought a pack of 200 for around $1.99 CAD at Staples. (You might be able to get it for even less if you buy it in a roll.)
I saw them in clear and in white, although you can probably find them in multi-colours, too. I suggest using any except for the clear. You want to be able to easily see the sticker in contrast to your nails.
This is what the stickers look like:

Make Sure Your Base Colour Is Completely Dry
After priming and painting your nails as usual, make sure that your base colour is completely dry before you use the stickers. If you’re too quick to jump the gun, the sticker might lift or smudge your polish.
I suggest doing a Ruffian manicure over a polish that you’ve already been enjoying for a couple of days. This ensures that the polish is completely dry. Plus a half moon manicure is a great way to conceal tip wear and extend your existing manicure! 🙂
But…if you want to do a half moon manicure right away and don’t want to wait for the base colour to dry, try using a fast-drying top coat to speed things along.
Sticker Placement
Of course it’s up to you how you place the sticker. If you move it higher up, less of the ‘cuticle colour’ will show. This is how a traditional half moon manicure is supposed to look.
What I did, since it was my first time, wasn’t traditional. I had placed the sticker a little bit too far down, which is why the ‘cuticle colour’ shows up more.
After wearing it, though, I still really liked the look because you can better see the two colours equally instead of the ‘tip colour’ standing out more.
However, they’re your nails, so do whatever your preference is. There really is no right or wrong when it comes to nail design. If it pleases you, that’s what counts.
Sticker Application
Before you paint the tips of your nails, I suggest placing the stickers on all your nails first. This will help you avoid fumbling around with the little stickers when some of your nails are wet.
When to Peel Off the Sticker
Immediately after I finished painting one hand with the ‘tip colour’, I peeled off each of the 5 stickers. Then I repeated it for the second hand.
How to Peel Off the Sticker
Gently lift the sticker and slowly peel it off from left to right or from right to left. If you rush to peel it off, some polish may seep underneath.
For your first hand, you can use your second hand (that doesn’t have the tips polished yet) to remove the stickers easily. But when you come to removing the stickers on your second hand (and your other hand has freshly painted tips), I suggest using tweezers to help you peel off the stickers. This will reduce your chance of smudging wet polish on your other hand.
Haha, now that I’ve typed out these tips, I’m thinking that maybe I should’ve just photographed each step for a detailed tutorial. Didn’t realize that I’d be so windy! 😉 Well, I hope you get the idea.
What colour combinations have you tried for a half moon manicure? Do you have any additional tips and tricks to add?


How did u line up the stickers on each finger, so each finger had the same amount of its tip painted? I’m giving it a try now & that part makes me nervous.
Hey Melissa!
I just eyeballed the stickers. But if you want to be more accurate, if you look through the hole of the reinforcement sticker, just make sure that the same portion of nail is showing. Then you should get a more balanced look. Really, though, just eyeballing it is fine. They don’t all have to be perfect. If you just get them roughly close, when your nails are all together, it’ll still look lined up. 🙂
Which colours did you decide to pair?
Sorry! My 5 yo has been in hospital with pneumonia, this is my first chance to get on the computer (he just came home today & is doing great!). I had painted my nails last Thurs with Essie Aruba Blue (BEAUTIFUL color), but by the day I saw your 1/2 moon post the tips were already starting to wear away, I grabbed the silver Sally Hansen I had, I didn’t have the little stickers with holes in them, the dots I have are a little bigger, but it seems to have worked ok, it was a very quick job. I’ll try it again. Thanks so much for these great tips & I can’t wait to see more tutorials.
Don’t be sorry – I’m grateful that you comment at all, let alone visit my blog!
Oh no…that’s awful to hear that your son had pneumonia, but I’m glad that he recovered. Must have been pretty stressful, though.
You have such a great attitude – even if things don’t turn out perfectly, there’s always a second try. 🙂 Keep that positive attitude, and you’ll continue to go far.
P.S. Thanks for the encouragement. I need to think up some new Hallowe’en nail art because I really want to do tutorials closer to October. 😀 (Hallowe’en is my favourite holiday.)
I personaally prefer when the base shade shows up more like this than the ‘other’ way to do a ruffian. I am gaga over Charisma – I might end up getting the black one in this Gen X collection when it hits since I know now it’s got a smooth finish and not any grit to it like most all the other black glitter containing polishes I have do.
Hey beachgal!
YAY! Haha, although now I realize that what I did wasn’t a Ruffian manicure, but more of a half moon manicure! :S Oopsie! Now I’ll have to do another manicure for the reader request. Actually, I think the Ruffian manicure is going to be easier. Now to just think of a different colour combo.
Illamsqua Creator isn’t smooth like a creme, but yeah, it’s nowhere near as gritty as, say, China Glaze It’s Alive!
I love this look!!! The two polishes look so great together! I also love the way you did this ruffian. I’ve tried it with the curve going in the other direction and it wasn’t a good look, smh.
MariJo recently posted: Girly Bits – Arctic Sunrise
Hey MariJo!
It was like Illamasqua knew I was lazy and so they put out two perfectly coordinating colours. Uhh…nope…the nail-polish world sadly does not revolve around me. 😉 If it did, I fear that we’d see too many greens…if there is such a thing. 😛
You know what? I went and changed the name to Half Moon Nails. I realize now that a Ruffian manicure is different – like what you mentioned (the curve the follows the cuticle). I’m going to try that since I’ve never done it before…hehe and also because that’s actually what my reader requested. Sheesh! I’m embarrassed that I did the wrong type of nail art. *Blush*
Oh so lovely Mary! I must try this, so glad for your tips and tricks
Naomi recently posted: Purple Glitter Nails
Hey Naomi!
Glad that you found my little tips helpful…and that you liked my little fingertips. 😉
Oh boy…but I made a mistake. These should be called Half Moon nails, not Ruffian nails. Oops! I realize now that Ruffian nails are supposed to be a thin C shape following the cuticle. I’ll do that one next.
Love this.
Hey Ashley!
Thanks! Do you think you’ll try it out? And, if so, which colours would you use?
Hey Mary, Thanks for doing the ruffian mani 😀
i love this colour combination ! the trick with the stickers is great !
i think im gonna do it with Catrice “Genius In The Bottle” as base colour and OPI Pink Friday.
Hey Greta!
Your colour combination sounds cool. You should take photos of it and post it on my Facebook wall! I’d love to see, and I’m sure so would other blog readers.
Haha, you’re welcome! 🙂 Got Half Moon confused with the Ruffian. But, on the bright side, now I can say that I tried both designs for the first time. Been wanting to do these for a lonnnng time. Just needed the push.