 Happy Valentine’s Day, everyone!
I love Valentine’s Day because it serves as a reminder to appreciate the people we’re so lucky and blessed to have in our lives whether you’re happily married or single.
Will you all be my nail Valentine? 😉
It seems like it’s been a long time since I’ve done a nail-art tutorial, and I couldn’t let February 14 roll by without doing something!
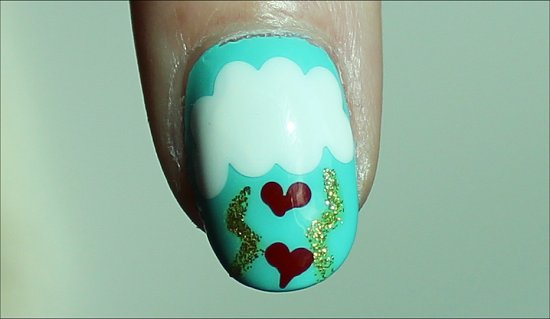
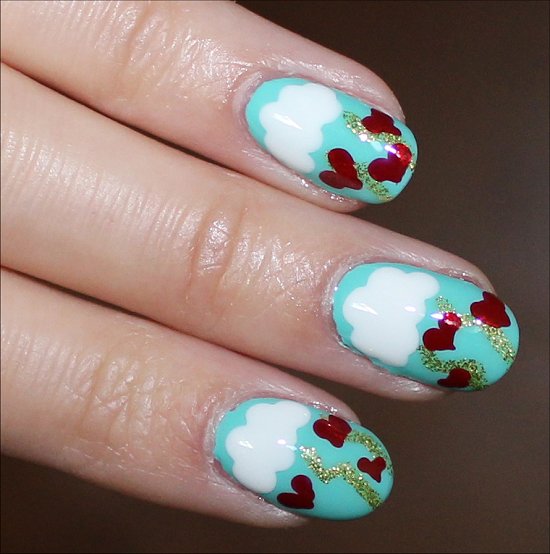
So, here are some quick little Valentine’s Day Nails. If you turn your head to the right (or look at my other photos in this post), you’ll see that they have fluffy, white clouds that have lightning and that are raining down a slew of hearts.
My inspiration for this was the cheesy (but fun!) song, It’s Raining Men! Instead of men, though, I thought I’d paint hearts.
This is a very easy manicure that you can whip up in a pinch. Hope that some of you will try it sometime, even if you don’t today. 🙂
I wish you all love and happiness! Thank you for being the best blog readers in the world – it brings tears to my eyes at how loyal you are!
Valentine’s Day Nail Art Swatches
All swatches have:
- OPI Natural Nail Base Coat
- 2 coats of China Glaze Aquadelic (This was sent to me by PR.)
- Clouds: OPI Alpine Snow
- Hearts: L.A. Colors Art Deco Nail Art Lacquer in Red
- Lightning: Milani Nail Art in 701 Art of Gold (This was sent to me by PR.)
- Seche Vite Dry Fast Top Coat
Sunlight Photos


Flash Photos


Natural Light Photos


*~* Valentine’s Day Nail Art Tutorial *~*

What I Used:
- OPI Natural Nail Base Coat
- Seche Vite Dry Fast Top Coat
- China Glaze Aquadelic
- OPI Alpine Snow
- Milani Nail Art in 701 Art of Gold
- L.A. Colors Art Deco Nail Art Lacquer in Red
- Piece of foil
- Daniel Stone Art Tool #5
Step 1: Apply a Base Coat
Step 2: Paint Your Nails the Background Colour
I opted for a beautiful, bright blue-green – China Glaze Aquadelic from the ElectroPop Spring 2012 Collection.
If you don’t have this colour, how about a baby blue? You can choose any colour you want. Just make sure that it provides a nice contrast with the white clouds and that it’s not too dark so that the hearts will show up well.
Wait a good 10 minutes so that this has time to dry a bit. Then proceed to the next step.

2 Coats with Flash
Quickie China Glaze Aquadelic Review
I’ll be doing a separate post reviewing this polish in a few days, so this is just a super-mini review.
China Glaze Aquadelic is a highly pigmented polish that is very similar to China Glaze For Audrey. The formula is thick, but also runny at the same time.
Edit: Click here to see my China Glaze Aquadelic swatches & review in its own separate post!
Step 3: Add Some Fluffy Clouds
Add some white polish onto your piece of foil. You’ll be using the foil as a palette.
Using a large dotting tool, the end of a brush handle, or another tool you have handy, carefully dip it into the white polish. Add a bunch of dots in a little cluster on each nail. This will form your clouds.
Don’t worry about them not all being identical. In fact, I think they look better when they’re different. It adds a whimsical touch and makes it look like you did it by hand, so it’s more personal. 🙂

Step 4: Create Lightning
Using a glittery-gold nail-art striper brush, I added some bolts of lightning. If you don’t have this colour, you could use a metallic gold or even a metallic silver. And if you don’t have those, I think it could still work with a creme black polish. (The key is to use what you already have.) 🙂
Also, notice how on my index finger, the lightning bolts are off to the side compared to the ones on my other nails? It’s okay if they’re not all the same. By the time you add the hearts, it’ll all blend in.

Step 5: Add Cute Hearts
Add some red nail polish onto your piece of foil. Then, dip a smaller dotting tool into the polish.
To create each little heart, just add a dot and then slightly drag your tool down. Then, do the same just to the right of what you just painted. Connect them together.
I painted the hearts on randomly. There was no method to my madness. And I didn’t mind if two hearts overlapped. The more random the hearts are, the more interesting I think it looks.
Tip: I suggest using a jelly (i.e. translucent) red polish because it allows the glitter from the lightning bolts to peek through. Also, since the hearts are supposed to be like ‘rain’, it adds more visual interest.
Also, feel free to create pink hearts, green hearts, or even a smorgasbord of different-coloured hearts. 🙂 Just do what makes you happy. These are your nails, so feel free to get as creative as your artistic heart desires!
Allow all of this to dry for a good 20 minutes or so before proceeding to the next step. If you get impatient and slap on a top coat too early, you may smudge your design with the top coat, and we don’t want that, right? 🙂

Step 6: Seal Everything with a Good Top Coat
Hope you enjoyed this very quick and easy Valentine’s Day nail-art tutorial! 🙂
If you try your hand at this or any of my other designs, please feel free to post photos of your manicure on my Facebook page. I’d love to see how yours turn out, and I know that everyone else would love to be inspired, too!
What’s on your nails for Valentine’s Day? Do you celebrate February 14th, or is it just another day for you?
Edit: China Glaze retweeted this post to their followers! 😀 YAYYYY!


This is sooooo cute Mary!! I love it. I hope you have a great day!! I celebrate Valentine’s day, but I don’t have any plans this year. Just work and then coming home. I’m okay with that though. And yes, I’ll be your nail valentine ;0).
Marisa recently posted: Hearts Anyone?
Hey Marisa!
Thank you so much – just something small I whipped up to celebrate this fun holiday. 🙂 I really like your heart nail art!
YAY for being my nail Valentine…hehe! Us nailphiles gotta stick together.
Happy Valentine’s Day Mary! I’ll definitely be your Nail Valentine! It’s been so long since I last commented (I think 5 days!), my Internent’s been having problems and it keeps going down when I open up the Internet! Valentine’s Day is the one of the few days I turn into a girl cause I’m kind of a tomboy except for my nails. I’m wearing Polka Dot nails for Valentine’s Day!
I’m so distracted I forgot to mention those nails are adorable and I wish I could try the design! I’m almost out of gold glitter polish and my nails are really short and I can’t paint much hearts on my nails!
Oh, maybe you can make the hearts smaller with a tiny dotting tool or toothpick? That way, you can add more hearts, but they’re just smaller than the ones I’ve showed.
Silver for the lightning bolts could work, too. 🙂
Hey maddy!
You were definitely missed! Glad to see you’re back. 😀 I’m so glad that your Internet is working now. Technology can be very stressful when it doesn’t work! Hmm…how did you end up fixing the problem? Or was it the service provider’s problem?
Your polka-dot nails sound so adorable! 😀
HAPPY VALENTINE’S DAY to you, too! And thanks for being my Valentine. 😉
Very cute! For some reason it has me thinking “It’s Raining Men”
thecandiedmango recently posted: Stuff in my Purse
Hey thecandiedmango!
YES! Exactly what I was going for! I’m glad that you got it. 😀
Hey Mary !
I love the nail art , it’s so original .
I just wanted to wish you a happy valentine’s day :]
-Candy
Hey Candy!
Happy Valentine’s Day to you, too!
Thanks for the kind words – I’m going to try to come up with some new nail art for St. Patrick’s Day, but I need to post it earlier. This Valentine’s Day nail-art design was done pretty quickly. Been busy, but I knew I had to do something fun! 😀
I like this design and the bright background! It pays homage to Valentine’s Day without being all pink and red. I mean, pink and red are two of my favorite colors, and I love seeing them everywhere on this one day out of the year. At the same time, though, it’s refreshing to see Valentine’s Day nail art with a unique spin. I can’t wait to see your full review of Aquadelic! It reminds me a lot of For Audrey as well–in fact, when I first saw the picture for this post, I thought it was For Audrey.
Hey Jessica!
Thanks – I’m glad that you liked how it wasn’t a traditional in-your-face Valentine’s Day design. 🙂
My review on Aquadelic is coming really soon. 😉
Ooooh!! Pretty!
Just got Aquadelic last weekend but haven’t given it a try yet. This tut looks easy enough that it might be something even I could at least try. 😀
Hey karen!
Oh, I really do hope you’ll try this. Seriously, it’s very easy to do, and there are so many ways to customize it to your liking. If you use nail sequins, it would be cool to use them – then you can have all different shapes raining down, so it’s not just a Valentine’s Day look. 🙂
Try it! Try it! Try it! *ruffles pom poms* 😉
What a great source of inspiration and lovely valentines day manicure! I really like how the background is blue rather than the traditional pink and red 😀
I will be your Valentine 100x over 😀
Marta recently posted: Guest Post – Jasmine from Colour Coated
Hey Marta!
Hehe, 100 times over? Wow! I’m set for life! No more looking for Valentines ever again…hehe!