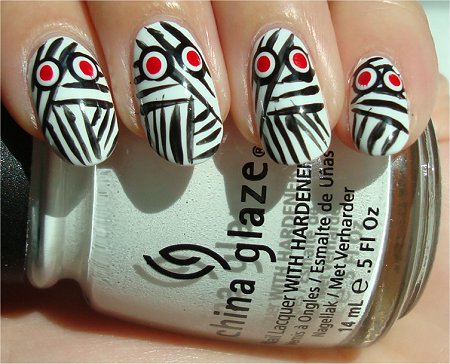
 Today’s Hallowe’en nail art: Mummy Nails!
I decided to put a little spin on it. I tried to go the underground-graphic-novel route for my mummy nail art.
Classic mummy nails consist of more horizontal lines, but, as you can see, I changed it up by adding lots of thick diagonal and vertical lines. I felt like this gave it more of a wrapped and comic-sketched feel.
This is another design that’s super simple to do – you need 3 colours and it’s just freehand lines and dots.
Plus the cool thing about giving them red eyes is that if you accidentally smear them while putting on a top coat (like I did), it actually gives them that bloody-eye look, which is tres chic avec les momies, n’est pas? 😛
Mummy Nail Art Pictures
Swatches
All swatches have:
- Nubar Foundation Base Coat
- 2 coats of China Glaze Snow
- Lines: NYX Ink Nail Art (Black)
- Eyes:
- China Glaze Liquid Leather (Black)
- China Glaze Snow (White)
- Nubar Sensual Red (Red)
- Seche Vite Dry Fast Top Coat

Direct Sunlight

Direct Sunlight

Direct Sunlight

Direct Sunlight

Flash

Flash

Flash

Natural Light

Natural Light

Natural Light

Natural Light

Natural Light

Direct Sunlight – This nail reminds me of a zebra!

Flash

Natural Light
*~* Nail Art Tutorial *~*

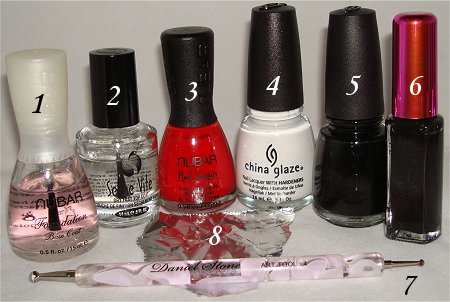
What I Used:
- Nubar Foundation Base Coat
- Seche Vite Dry Fast Top Coat
- Nubar Sensual Red
- China Glaze Snow
- China Glaze Liquid Leather
- NYX Ink Nail Art (Black)
- Daniel Stone Art Tool #4
- Piece of foil
Step 1: Apply Your Base Coat
Step 2: Paint Your Nails White
You may need to apply 2 or more coats since white nail polish tends to be streaky.
Wait a good 8 minutes before continuing to the next step. This will ensure that the polish has a chance to dry a bit so that when you paint over it, it won’t pull at the white polish.

2 coats of China Glaze Snow
This is the first time that I’ve ever used China Glaze Snow, and while it’s not perfect, it gave me great coverage in just 2 coats. Also, it’s a stark white, so it’s perfect for when you need a really clean, bright white.
Step 3: Add Black Lines
This part doesn’t need to be precise. Taking your striper, apply diagonal, vertical, and horizontal lines. Each nail doesn’t have to have the same pattern. Not all mummies are wrapped the same!
What I did was work on my nail near the cuticle first. I alternated the direction of my diagonal lines on every other nail. Then I added my horizontal lines, followed by any-direction lines near the tips.

Step 4: Add Black Dots
Add a few drops of black polish onto your piece of foil. Then dip your dotting tool into it. Carefully place 2 dots on each nail.
Wait a few minutes to allow this to partially dry before proceeding.

Steps 5 & 6: Add a White Dot & Then Red Pupils
Use the same method in the previous step but with white polish. When you dot the white on top of the black dots, try to leave a ring of black. This will outline your eyes more, especially since there’s so much going on elsewhere.
Wait a few minutes to allow this to partially dry.
When you apply the red pupils, try to keep them in the middle of the white dots you just made.
Wait 15 minutes to allow all of this to dry some more.

Step 6: Apply a Top Coat
When you put top coat on, try to barely touch the design with your brush. Use a large glob of polish and just glide that on. This will minimize any smearing. But like I said earlier, with this design, even if you smear the eyes, it just adds to the cool effect.
Hope you liked this simple nail design! 🙂
Have you ever dressed up as a mummy for Hallowe’en? What is your favourite Hallowe’en character? Mine’s Frankenstein’s Monster! (I’ll try to do a nail-art tutorial on that later.)


Hahaha! I never dressed up as a mummy although I remember playing a game at a party in teams of 2. One person wraps the other with toilet paper as fast as they can and embellish if they still have time. Best mummy voted by the crowd wins! Oh, that was fun. 😛
No favorite character, really, but I have a soft spot for the jack o’ lanterns. 🙂 Excited to see your take on Frankie!
Carmela recently posted: Nail Art Wednesday: Special Birthday Nails Part 2
Hey Carmela!
Did you ever win that competition? I never did, but, yes, it was always so much fun. And when it was over, it was also funny to see the person get out of all that toilet paper.
Really like this nail design simple and cute! When I was little I usually dressed up as a princess or a fairy not so Halloween ish I’m afraid. Funny part is that now I prefer more darker stuff – I like zombies/vampires/witches. I really hope they show some typically Halloween movies on tv this year!
Hey Elyne!
Thank you! 🙂
I always wanted to go as a fairy, but somehow I ended up going as everything except that…until I got older. Let’s see…I’ve been She-Ra, a witch, a cat, a hippie, a doctor, and a princess when I was a kid. I’m sure there are more, but it’s not coming to me right now. Funny how only when I got older did I start to wear more Hallowe’eny costumes.
Me, too! Do you have some favourite Hallowe’en classics/movies that you like to watch every year?
I’m totally in love with the Halloween Town movies – They are kids movies but I still like them. Further I like Beetlejuice, the corpse bride, hocus pocus. And ofcourse the bit more scarier movies like all the Halloween movies, Nightmare on Elm street ( who still creeps me out), not so scary anymore the Scream trilogy ( I still need to see the 4th movie) and on my list to watch is still all of the Harry Potter movies I think I only saw 3 or 4 of them – i really need to find a box set.
Haha, Beetlejuice made me laugh! I really enjoyed The Corpse Bride more than I thought – the characters were so endearing, the music was fun to sing along to, and the detailing was really impressive.
I watched more scary movies when I was a kid, oddly enough. And when I do watch one now, I get so freaked out. Even when something’s not scary, I get scared. 😛 And movies that are more creepy than scary freak me out the most. Like that movie, Dead Silence – it’s not scary…it’s creepy. When I left the theatre and was waiting for the subway train to come, someone was standing behind me (and I didn’t notice them until the last minute)…Made me JUMPPPPP! Then, of course, I felt really silly.
I love the design – very comic book! I always wore princess or gypsy outfits for Halloween when I was a kid, mainly because I could wear lots of layers or a coat underneath if it was cold. 🙂
mellinail recently posted: Thanksgiving Arrangements and More Porcelain Berries
Hey mellinail!
Thank you! 🙂
The gypsy costume sounds like so much fun with lots of colourful prints and textured fabrics. I wouldn’t mind dressing like that now for Hallowe’en! But most likely I’ll go as something gothic.
these came out so great!!
rae recently posted: Minor Setback
Hey rae!
Thank you, and they were really fast to do. Hehe, some people on the subway were staring at my nails – half in disgust, though. But I don’t care…I have fun doing nail art even if others don’t like it.
omg this IS AWESOME! As soon as the page loaded, I did a little gasp and was like, MUUUMMYYY! I really like the style and the freaky red eyes. Reminds me of Picasso meets halloween. I just love it so much Mary!
Hey Vivian!
YAY – I’m so glad that you really like my take on mummy nails. 😀 Thank you so much!
Pingback: » And I’m Back! The Daily Nail: Dupe or No Dupe? Nailed
Very cool to get a shout-out on that blog. 🙂 Thank you!
We did the same thing yesterday!!! I love yours a lot! You’re super talented!!
xoxox
Alexis recently posted: Where’s My Mummy?
Hey Alexis!
Aww…thanks so much! I really enjoy challenging myself to try different designs.
I took a look at yours – love how you used OPI Skull and Glossbones. Very fitting! 🙂
I love your take on mummy nails!! The diagonal lines definitely make it more interesting! Love the creepy red eyes! 😉
Hey Ruthe!
Thanks! 🙂 This manicure was mistaken for zebras once, though. Haha! That poor red-eyed zebra…
Cool I am Lovin It (y) 😉
Hey Naina!
Thank you! 🙂