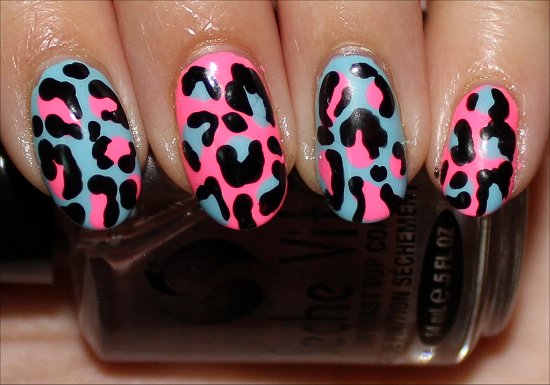
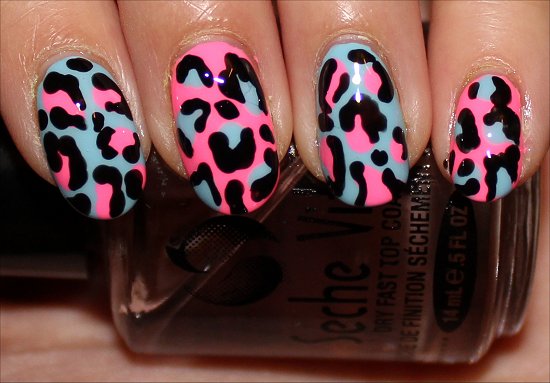
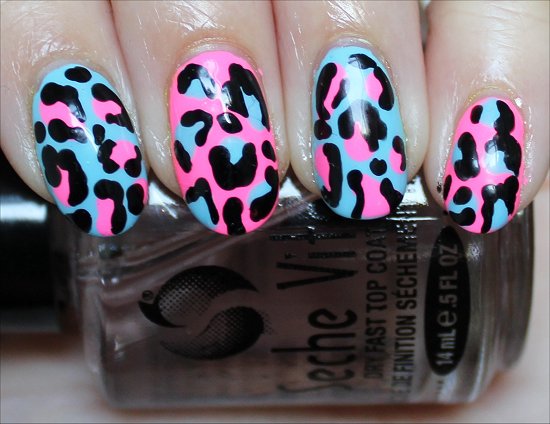
 When you don’t have the patience to do intricate nail art that requires a lot of concentration and supplies, these Pink & Blue Leopard Nails are a great choice!
The messier the spots and outlines are, the better it looks, in my opinion. Also, you don’t need many polishes or tools to achieve this look. (That’s always a plus!)
And for those of you who don’t have any Konad or other nail stamping image plates with the leopard design, this post is to show you that you can still get the look by doing it freehand. 🙂 Try to be resourceful, and you may surprise yourself with the designs you can come up with. (I actually like the imperfections that freehand designs often have. They’re almost like your signature on each manicure in a way.)
Since I couldn’t decide whether to use blue or pink as the base colour, I thought…heck, why not just use them both? There aren’t any hard and fast rules when it comes to nail art. Just do what works for you and what pleases you.
For this look, you can see that I alternated between pink and blue. You might want to do something else…maybe a different base colour on each nail? (That would be cool to have a rainbow leopard design!)
Pink & Blue Leopard Nail Art Swatches
All swatches have:
- CND Stickey Anchoring Base Coat
- Base Colours:
- 3 coats of China Glaze Shocking Pink (pink)
- 3 coats of OPI What’s with the Cattitude? (blue)
- Spots:
- 1 coat of China Glaze Shocking Pink (pink)
- 1 coat of OPI What’s with the Cattitude? (blue)
- Black Outline: China Glaze Liquid Leather
- Seche Vite Dry Fast Top Coat
Flash Photos


Natural Light Photos


*~* Pink & Blue Leopard Nail Art Tutorial *~*

What I Used:
- CND Stickey Anchoring Base Coat
- Seche Vite Dry Fast Top Coat
- OPI What’s with the Cattitude?
- China Glaze Shocking Pink
- China Glaze Liquid Leather
- Daniel Stone Art Tool #4
- Piece of foil
Step 1: Get Your Supplies Ready & Apply a Base Coat
Unscrew the caps of all the bottles a little so it’ll be easier to open when your nails are wet. And get all your other supplies within arm’s reach so you’re not scrambling around playing Hide and Seek.
Tip: When you’re picking your colours, consider using polishes with different finishes. I think it would be interesting to have matte and glittery polishes. It’ll add that extra dimension that my manicure is lacking.
Always be sure to wear a base coat because not only does this protect your nails from possible staining (or at least reduces the degree of staining), but it also helps the polish you put on top last longer in many cases or even apply more smoothly.
You probably have no idea, but my natural nails have some ridges. There was a time when I used to buff my nails to get rid of them, but I no longer do that. I find that just using a plain base coat, even if it’s not a ridge filler, actually makes the surface smoother!
And back when I was in high school, I never wore a base coat or top coat because I thought it was too much work! Hahaha, my have the tables have turned! Pretty much 99.99999% of the time, I wear a base coat and top coat because it makes my manicures last a long time, plus the finished look is way better than if you didn’t use them. I really believe it’s worth the extra effort.
Step 2: Paint Your Nails with the Base Colour(s)
Of course you can choose whatever shade(s) tickle(s) your fancy. Using a neon pink and a pastel blue made my ‘fancy’ very, verrrry ticklish. 😉
I like taking ‘sweet’ colours and transforming them into fierce beasts with a nail-art design because it’s not as predictable. Then again, leopard nails are everywhere, so maybe it is predictable…
Here I used 3 coats of each colour because I wanted the base to be completely opaque and streak-free.
After you paint your nails, make sure you wait at least 5 minutes before proceeding to the next step.

3 coats of OPI What’s with the Cattitude? (blue) & 3 coats of China Glaze Shocking Pink (pink)
Step 3: Add the Spots
Put a few dollops of polish onto your little piece of foil. Then, take your dotting tool, the end of a bobby pin, the end of a pen cap, or even the end of an old makeup brush and dip it into the polish.
When you add the spots to your nails, don’t use the dotting tool as it was intended to be used. (i.e. Don’t just add circular dots.) Instead, lightly dab and then drag the polish slightly. This will create odd shapes. The more asymmetrical the spot is, I think it looks much more interesting. So, for this design, being messy is actually a good thing!
When I did this manicure, I was watching Big Brother and wasn’t really paying attention to what I was doing. And I found that it was really fun to just put on any ole shape wherever the heck I wanted. No precision is necessary! 🙂
I liked the way this turned out so much that I considered just stopping here and wearing these radioactive ‘dinosaur-egg nails’ like this. But…I had wanted to do freehand leopard nails for such a long time, so I continued. Now I can check that off my To-Do List. 😉
After you add the spots, wait a few minutes (maybe 5) just so that the polish isn’t completely wet before you proceed to the next step.
Tip: To create the spots, I used the larger end of my dotting tool. I suggest using a small dotting tool for the outlining later on.

Step 4: Outline the Spots
Add some black polish onto your piece of foil. Using a smaller dotting tool (if possible), add some lines, rings, and dots around the spots you just created. But, don’t fully outline the entire spot. You want some free edges.
Also, try not to use smooth lines with an even width. You want it to be splotchy so it looks more interesting.
To fill up some spots that may be bare on your nail, add some random black spots.
Tip: After you finish this, I suggest waiting a long time to allow your design to set a little. (I waited 30 minutes because I was watching TV while doing this.)
Don’t jump the gun because if you add a top coat too soon, you’ll smear everything, and remember, all those spots have thick polish, so it takes longer for those sections to dry than when you’re painting your nails normally.

Step 5: Add Your Top Coat
Hope you liked this easy nail-art tutorial and that you’ll try it out. Remember, feel free to share any manicures you’ve done on my Facebook wall so that everyone can see and be inspired. 🙂
What colours would you use for this design? Will you be trying it out? Do you prefer freehand leopard nails or stamped leopard nails best?


I love these Mary! I have been seeing them all over the place but haven’t had the courage to actually do them yet. When I do, I will definitely come back here 😉
Hey Erica!
I know, right? Every time I’ve seen freehand leopard nails and read how easy they were to recreate, I kept wanting to try my hand at it! And I’m pleased to say that it really IS as easy as everyone says it is.
Hehe, and those who say they have shaky hands should try this design. I think having shaky hands helps with the outlining. (For the record, I actually have shaky hands!)
Okay…points for totally cool!!
I still haven’t mastered the stamping set in spite of multiple tries, but this looks easy enough that it’s definitely worth a try!
Thanks for a great tut!
huggles!
Hey karen!
Yay – what can I redeem with those points? Can I get a shiny pin or a bottle of polish? Hehe, or can I just redeem them for an inflated ego? 😉
It’s actually good not to master stamping. If you look at it this way, there’s a lot of room for growth and learning. 🙂 I’m not the best at stamping or nail art, either, but I like it because even when I screw up, I can learn from it. I don’t think it’d be as fun if every single thing I did was amazing. Then I might not appreciate the good designs as much or the effort I put in.
Leopard nails are some of the first designs I did when I started with nail art! They’re still a favorite for the impact that they have vs. how easy they are to do 🙂 Love the colors that you picked!
Casual Spark recently posted: 31 Day Challenge, Day 11: Polka Dots
Hey Casual Spark!
Hmm…the first nail-art design I did was probably fried egg nails…haha! But the first stamping design I did was a leopard print, and it’s a pattern that I really could never get sick of because the possibilities are truly endless. Even if you just change one of the colours, you get a completely different look. 🙂
Thanks – glad you liked this design!
i love animal print.. i have plates with the stamp on it, but my very first print was done with a toothpick, so I’m sharing this tutorial to my tweeps 🙂
maria emma recently posted: Houndstooth / Textiles
Hey maria emma!
Thank you so much for sharing the love! 😀 That’s very flattering.
I love this! The color combo is sooo fun! I had leopard spots in bronze and black over taxicab yellow on my toes a couple of months ago and I loved it so much I kept it on for like four weeks lol!
Hey Kristen!
Ohhhh, your colour combination is something I know I’d love wearing, so I totally understand why you wanted to wear it for as long as possible. 🙂
Nice!! These 2 look great together. I’ve been thinking of doing a lepored print all Sept, and just haven’t found the time to do it yet! I also wanted all neons skittles too (apparently I want neons in the fall).
Karen recently posted: Southern Ontario Nail Blogger Meet Up!!!
Hey Karen!
Neons all year long get the thumbs up from me. 🙂 (I actually love wearing neons in the dead of winter when there’s snow all around. The neons pop even more.)
Maybe you could do neon skittles and then a leopard print on top! *Drools*
Great colour combo! I don’t do much nail art as I have no patience, haha, but this could be fun to try, I also want to do the fishtail one sometime, too!
Hey Amanda!
Yes, I encourage you to try this and the fishtail design. Both are really a lot of fun to wear. The fishtail one takes a lot more time and concentration than this leopard one, but it’s still relatively simple and rewarding! 🙂
I love it! I’ve got to try freehanding leopard spots one of these days! I always do my nails when I watch big brother too, how funny!
Brianna recently posted: My Favorite Things Nail Art Challenge: Day 6- Stripes
Hey Brianna!
Do you know which colours you’d use for the design?
Nice! So who’s your favourite on Big Brother? (I’ve missed a few episodes – need to catch up by watching them on Rogers on Demand.) And have you watched it from the first season? I only got into it starting with last season.
I’d try to do maybe a hot pink and orange, something bright and fun. I am in love with Ian, and Dan’s one of my favorites too. I don’t remember when I started, I just got really into it the past three or four seasons.
Brianna recently posted: My Favorite Things Nail Art Challenge: Day 6- Stripes
That sounds like a super-fun colour combination. You should do it! 🙂
You know, at first I didn’t like Ian, but he really grew on me over several episodes. Haha, wasn’t it funny when Dan wanted to talk to Ian and when Ian was trying to go into the room, Jenn accidentally hit him with the door? 😛 And then he was going to leave with Jenn and Dan had to call him back. That was comic relief right there!
My favourite player is Dan. It blows my mind how he was able to orchestrate such a master plan when all the odds were against him. “Dan’s Funeral” was such a clever, cunning idea that worked. I do wonder, however, if the jury will give him enough votes because he rubbed some people the wrong way by being dishonest. That being said, if he’s in the top 2 with Danielle, I think he’ll win just because he played a strong game, and I feel like Danielle didn’t really do much. She just listened to Dan and was his underling. :S The person who wins should be someone who used a lot of social strategy, even if it was cunning and dishonest. I mean, that’s part of the Big Brother game. (Although I did like Frank and how he tried to be very honest throughout the game. But…Big Brother isn’t suitable for exceptionally honest souls, unfortunately.)
I completely agree! I have to write a paper on big brother and your comment just helped me so much! You said exactly what I’m thinking, whoever has the best strategy should win, which is Dan. He played a remarkable game and has proven once again that he is a BB great! I hope he becomes the first two-time winner, he deserves it.
Brianna recently posted: My Favorite Things Nail Art Challenge: Day 6- Stripes
How cool that you get to write a paper on Big Brother! What class is it for, and what’s your thesis?
Dan, Danielle, and Ian…I hope that Dan and Ian are left as the final two because then there will REALLY be a competition. I think Danielle is the weaker for the three, well, at least from how she’s played the game so far.
I’ve tried stamping leopard print designs and to be honest, I think freehand ones look better. I’ve never gotten around to trying it though, but this tutorial totally makes me want to do it! You make it look so easy, Mary! Altho, I’m worried my perfectionist side will take over and obsess too much over the small details. Love the color combo you went with! 😀
Carmela recently posted: Polished Indulgence is turning 1! [GIVEAWAY!]
Hey Carmela!
Haha, I don’t just make it look easy. It truly IS easy! 😀 Definitely try it. Can’t wait to see the colour combination you come up with. I know it’ll be a masterpiece as always. You’re so good at nail art and translating your inspiration onto your nails. That’s a real talent.
AMAZE-BALLS!!!!
How did I miss this post!!!!?!!!!
I lean very heavily on stamping (a crutch) to my weak freehand skills but I will admit that I LOVE the freehand cheetah/animal print… I do because you can space out your ‘spots’ as much as you want. This is a superbly done manicure Mary!
Marta recently posted: On this Day…
Hey Marta!
Nail stamping isn’t a crutch! Your creativity and originality shine through your masterpieces, Marta! I’m always amazed at how you manage to combine colours and patterns to make something that shows off your personality perfectly.
And your freehand skills are impressive, too. I still remember The Grinch nail art you did. It still blows my mind how great of an artist you are!