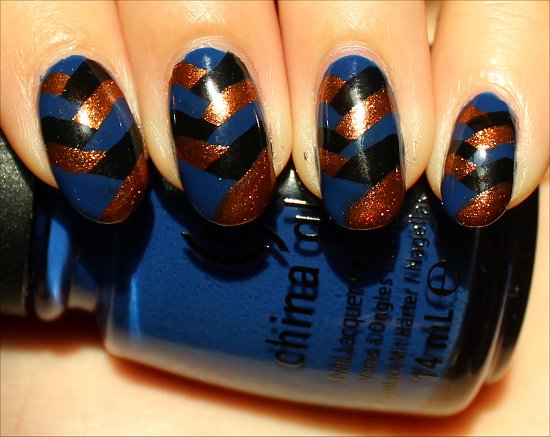
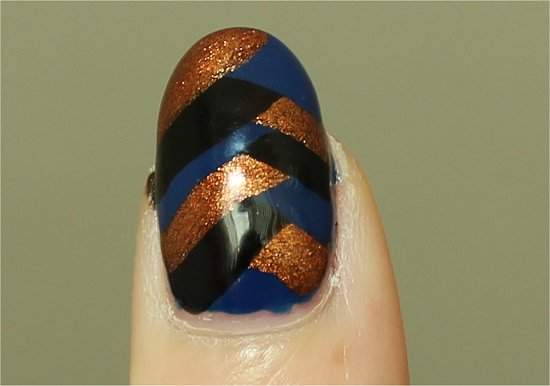
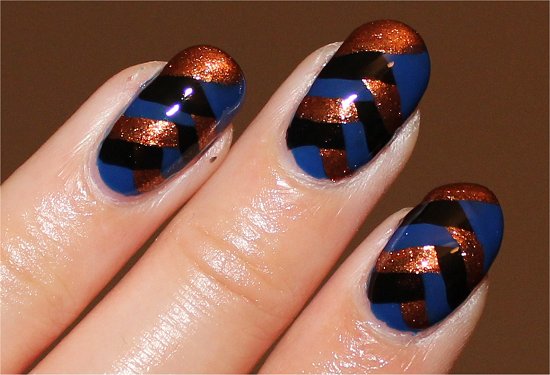
 Fishtail Braid Nails are not only really easy to do, but you don’t need any special nail-art tools, either!
The only thing you’ll need is some patience because you have to layer the polishes. But, if you have patience, you’ll be well-rewarded. 🙂
I was already wearing China Glaze Man Hunt as a manicure, so I decided to choose colours that complemented it. (The theme I was going for was Egyptian.)
Come see my step-by-step fishtail braid nail-art tutorial complete with photos so that you can see just how simple it is to do.
This was my first time doing this design, and now I want to try so many other colour combinations with the same technique – it’s addictive!
I think fishtail braid nails are one of the hottest trends right now. Will you be participating?
Fishtail Braid Nail Art Swatches
All swatches have:
- Nubar Foundation Base Coat
- 2 coats of China Glaze Man Hunt (Provided by PR.)
- Stripes
- Blue: China Glaze Man Hunt
- Black: China Glaze Liquid Leather
- Bronze: China Glaze Harvest Moon
- Seche Vite Dry Fast Top Coat


*~* Fishtail Braid Nail Art Tutorial *~*

What I Used:
Step 1: Apply Your Base Coat
Step 2: Paint Your Nails the Base Colour
I was actually already wearing a manicure with China Glaze Man Hunt (from the China Glaze On Safari Collection), so I didn’t have to paint my nails again. If you’re painting your nails fresh, make sure you wait about 10 minutes before continuing to the next step. (Alternatively, you can apply a fast-drying top coat to speed up the process.)
If you’ve been wearing a polish for a few days and want to spruce it up, doing fishtail braid nails is a great way to breathe new life into it! 🙂

2 coats of China Glaze Man Hunt
Step 3: Paint a Diagonal Line with Your 2nd Colour
These lines don’t have to be perfect. As you can see, mine aren’t perfectly aligned. It’s okay! 🙂 When you add the other colours, it all works as a collective.
Depending on how thick a coat you’ve used, you may want to wait a few minutes for this to dry slightly before continuing. In my case, I was able to paint all 10 nails and then continue right to the next step without waiting.

Step 4: Paint a Mirror-Image Diagonal Line with Your 3rd Colour
X marks the spot!
You’ll notice that the lines are really thick. As you overlap with other diagonal lines, you’ll be able to better adjust the thickness.
Again, you may choose to wait a bit for this to dry. But, for me, by the time I finished painting the last nail on my second hand, I went straight away to painting the next overlapping diagonal line.

Step 5: Continue Overlapping with the Diagonal Lines, Alternating Colours
You’ll be able to see the braided design form as you continue. Don’t worry about it looking sloppy. It’ll come together in the end. Trust me! 🙂


I stopped overlapping at this point, but I could’ve actually continued with another diagonal line of black. However, I really wanted blue and the copper to be on my tips instead of black. 🙂
Now, this time you really need to wait before proceeding to the next step. If you don’t, you risk ruining all your hard work! (I was watching TV, so I waited a full 30 minutes before continuing. You may be able to get away with just 15-20 minutes, though…It’s your call!)
Step 6: Apply Your Top Coat
Hope that you enjoyed my easy nail-art tutorial showing you how to create the fishtail braid design. 🙂
If you give it a go, please don’t be shy – feel free to share it with me and my readers on my Facebook wall!
Edit: I ended up doing a 2nd version. Click here to see my Summery Fishtail Braid Nails!
What colour combination would you do for this design? Can you actually braid hair in a fishtail? Are you superstitious? (Today’s Friday the 13th!)


This is so cute! I love fishtail braids and can’t wait to try this on my nails! Maybe an orange, pink and yellow would look cute for summer. I’m excited to try this soon! Thanks for the tutorial!
Brianna recently posted: Summer Fun Challenge- Day 8: Fun in the Sun
Hey Brianna!
I can’t wait for you to try it, either! The combination you mentioned sounds like so much fun. 🙂 I’m definitely going to do more colour combinations. Since this was with darker shades, I’ll try one with lighter, more summer colours.
I live under a rock and never seen this before.. thank u soooo so much for this detailed tutorial!!! If you don’t mind I will pull a ‘monkey see monkey do’ on you, just using different colors!! I really really like this look and i like that its so easy to do!!
Gosia recently posted: Holo Friday: Orly Skinny Dip “Holographed”!
Hey Gosia!
Rocks are cool, too. 😉 No worries!
I’m glad you enjoyed the tutorial. And I’m happy that you’re going to try it out with other colours. (I have a zillion different combinations I must try out!)
Wow, that’s really nice! I don’t think I have this kind of patience, or a steady enough hand, but maybe one day I’ll give this a try!
Hey Angie!
I just painted my nails while watching TV. Aww…you don’t need to be too steady. When you overlap all the colours, it looks ‘right’ in the end. Seriously…if you don’t believe me, just try it out on a single nail. You’ll see what I mean!
Very cute, definitely want to try this with some nice bright summer colours!
Hey Amanda!
Same here! 🙂 I’ll have to try it with fun, bright shades for sure.
WOW, I absolutely LOVE this color combination and pattern! Good job 😀 Too bad my nails are too short and square like to do this though 🙁 I guess I’ll have to try it with a think brush or something~
Hey lawren!
Thank you so much! 🙂 I wasn’t sure if I could do it, but sometimes you just have to try to find out.
You can still do it on your nails. Actually, I think it would look really good on square nails. But, yes, maybe use polishes that have thinner brushes – maybe Essie or China Glaze?
This is lovely. It looks easy the way you have shown to do it. I am not good when it comes to nail art unless it’s a little stamp or stick on decal. But I think I would be able to do this. I have all 3 of these shades too! I never would have put them together but ends up they look great.
Hey beachgal!
I have the utmost confidence that you can recreate this design. 🙂 The finished look is more complicated than the actual steps. Go for it! 🙂 And show me afterwards. 😀
I LOVE the colors…especially the copper color. I’m going to have to get that next!!
Hey Kellie!
Yeah, the copper really adds the bling and brings the manicure to life. Without it, I think the result would be very blah!
China Glaze Harvest Moon is a great shade that I recommend. Plus you’ll be able to wear it well into the fall, too, if you’re big on doing seasonal nail looks.
I have tried fishtail nails yet! But I have been thinking about giving it a go! I love this color combo!!
Thanks for the tutorial! I know where I coming when I get to chance to try it out!! 😀
Hey Kelly!
You’ll love the design. And it’s kind of like stamping in that the first time you try it, you want to do it again, but with different colours! 🙂
You’re very welcome. I was hoping that my tutorial would be useful to someone, so I’m glad that you found it helpful!
When you try it out, please share a photo of your manicure with me. I’m always inspired by other people’s colour choices.
You are such an artist! Thanks for the detailed tutorial! I tried this with China Glaze Frostbite, Liquid Leather and Lorelei’s Tiara. My left hand is so unsteady so my right hand nails look really messy, and I don’t know if I’ll have the patience to do this again, but I must admit the effect is quite stunning! Thanks again!
Hey MC!
Hahaha…oh, you flatter me! (I’ll take it! :D) Thank you!
Cool colour combination you chose. They’re all gorgeous, and I like how you got some bling in there with Lorelai’s Tiara.
Did you take any photos of your manicure? I’d love to see!
Great pairing of shades!!!
I have seen this technique here and there and I am tempted to try it now too! Looks so intricate 🙂
Marta recently posted: Weekend Stamped Manicure
Hey Marta!
Thanks! 🙂
You should try it. It looks more complicated than the actual painting process. I suggest getting comfy while watching your favourite TV show (I guess for you when the kids are asleep!) and then work your magic.
I love this look! I think I may try it with neons 🙂 I love bright colors for summer. I have a lot of patience with nail art because I think the more time you put into it, the bigger payoff you get. Please check out my blog and look at my frog mani. My favorite one yet and it was a couple hours to do. Love your page and your nails are beautiful!
Hey Brenda!
It’s good that you have a lot of patience when it comes to nail art…hehe, because this design definitely requires patience. 😉 But you’re right – it’s worth it in the end.
Hope you have a really fun time painting this – it’s going to look pretty awesome with neons. (I just suggest painting your nails a base white first so that the neons will pop more and so you won’t have to use as many coats for the neon stripes.)
I’ll be sure to check out your blog! 🙂
Oh my goodness that is so cool!!!!!!
I think I will give this a shot on the weekend (when I have more time and waste lots of time in front of the tv).
Thanks for sharing 🙂
Citygirl907 recently posted: The winter challenge day 12
Hey Citygirl907!
Please let me know how it turns out and what colours you used. It’s so neat how the same design can look completely different depending on the shades you use.
Love, love, love this color combo! (I might be a bit biased but Man Hunt and Harvest Moon look stellar together!) I’ve bookmarked this for future use. 😉 Did you do the same design on your dominant hand? That’s my only real concern. I know I’ll botch it up with my non-dominant hand. 😛
Carmela recently posted: Nail Art Wednesday: Shooting Star Nails
Hey Carmela!
Aww…that’s so sweet. Thanks for bookmarking it. I do hope you’ll try it.
Yes, I do a full manicure with the same design on both hands. All you have to do is rest your palm on a steady, flat surface. That’s my ‘trick’. My hands are actually extremely shaky, and when I do this ‘trick’, it’s how I’m able to do lines that don’t look like I drank 6 cups of coffee. 😉
Beautiful color combo! Great job!
Hey Myprettypaints!
Thank you so much! 🙂 At the time, I was craving dark shades, but then later I ended up doing the fishtail with summery shades in a second manicure. 🙂
Thanks so much for doing this tutorial, Mary. I never would have thought of this as a “simple” design from looking at it, but checking out your tutorial made me realize that even I could achieve this look. I finally posted about it here: http://impoverishedbypolish.blogspot.com/2012/08/neutral-fishtail-nails-featuring-opi.html
Hey another Cristina!
Oh wow – I’m so sorry that I’m replying terribly (embarrassingly) late to your comment! I didn’t see it until now, and it was by accident. Thank goodness I saw it now, though, or it would’ve forever been left like that!
You’re very welcome for this tutorial. I’m really glad that you found it useful. 🙂
I like the way yours turned out. Cool colour choices!